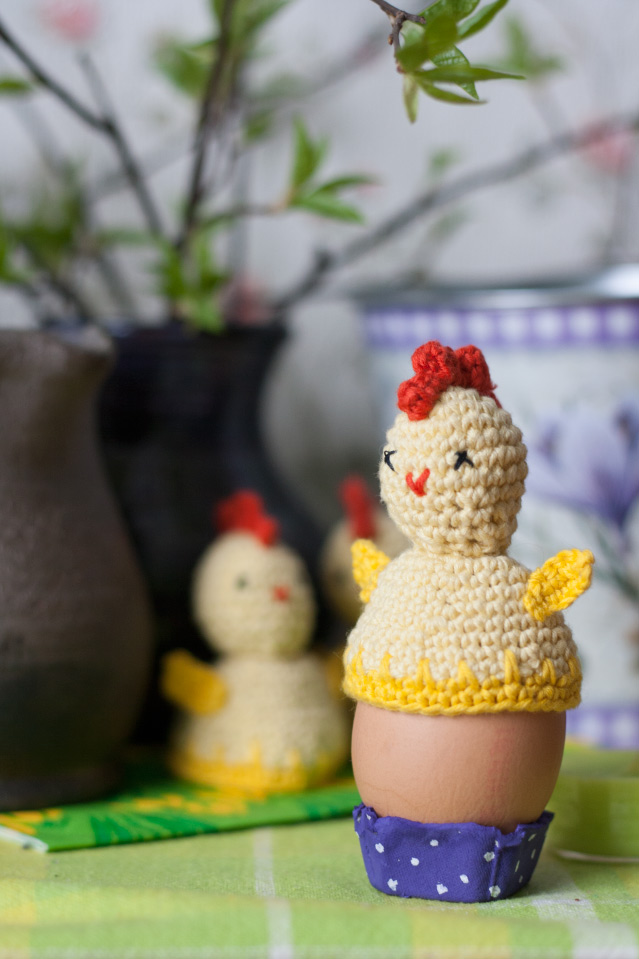
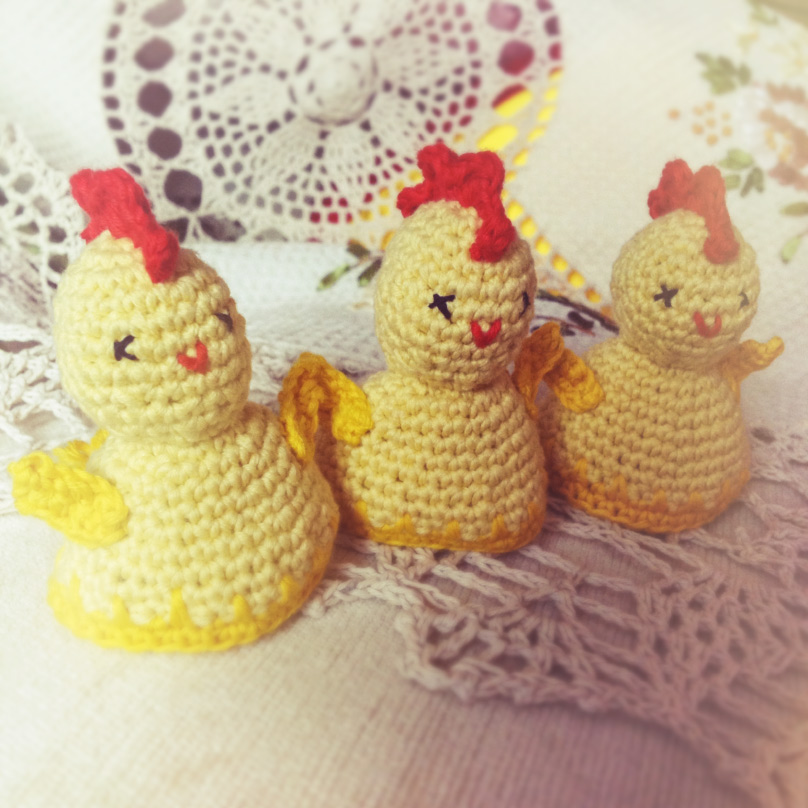
These beautiful little Easter Roosters will be happy to join you on your Easter brunch!
Три пасхальные курочки довязаны вовремя и готовы украсить собой пасхальный стол!
I used Alize Bella yarns for my roosters and a 2 mm hook.
You will need:
– a small amount of a light yellow cotton yarn,
– even smaller amount of bright yellow and red cotton yarn,
– a black thread,
– needle,
– stuffing and a marker (optional).
Понадобятся:
– меньше 1-го клубочка светло-жёлто пряжи,
– ещё меньше ярко-жёлтой и красной пряжи,
– чёрная нить,
– иголка,
– наполнитель и маркер для вязания крючком (но без последнего можно и обойтись).
See this page for abbreviations used in this pattern.
Условные обозначения к схеме находятся
здесь.
Now, the pattern!
Теперь сама инструкция!
The Head.
Take the light yellow yarn. Crochet the rows in a continuous spiral.
Ch 4, join to make a ring.
Rnd 1: Work 6 SC into the ring (6 sts all together).
Rnd 2: Work 2 SC into the each st of the row (12 sts all together).
Rnd 3: * [Work 2 SC into the next st, then work 1 SC into the second st]. Repeat 5 times from * (18 sts all together).
Rnd 4: * [Work 2 SC into the next st, then work 1 SC into each of the next 5 sts]. Repeat 2 times from * (21 sts all together).
Rnd 5: * [Work 2 SC into the next st, then work 1 SC into each of the next 6 sts]. Repeat 2 times from * (24 sts all together).
Rnd 6-7: Work 1 SC into each of the sts along the row. (24 sts all together).
Rnd 8: * [Work 1 SC decrease across the next 2 sts, then work 1 SC into each of the next 6 sts]. Repeat 2 times from * (21 sts all together).
Rnd 9: * [Work 1 SC decrease across the next 2 sts, then work 1 SC into each of the next 5 sts]. Repeat 2 times from * (18 sts all together).
Rnd 10: * [Work 1 SC decrease across the next 2 sts, then work 1 SC into the next sts]. Repeat 5 times from * (12 sts all together).
Rnd 11: Work 1 SC into each of the sts along the row. (12 sts all together).
Fasten off the thread and leave a long end in order to use it later for sewing together the head and the body.
Голова.
Светло-жёлтой нитью наберите 4 в.п., соедините в круг. Вяжите по спирали.
1) 6 ст.б.н. в круг (всего 6).
2) 2 ст.б.н. в каждую петлю (всего 12).
3) * [2 ст.б.н. в 1 петлю, 1 ст.б.н. в 1 петлю], повторить 5 раз от * (всего 18).
4) * [2 ст.б.н. в 1 петлю, 1 ст.б.н. в каждую из след. 5 петель], повторить 2 раз от * (всего 21).
5) * [2 ст.б.н. в 1 петлю, 1 ст.б.н. в каждую из след. 6 петел]ь, повторить 2 раз от * (всего 24).
6-7) 1 ст.б.н. в каждую петлю ряда (всего 24).
8) * [2 ст.б.н. вместе, 1 ст.б.н. в каждую из след. 6 петель], повторить 2 раз от * (всего 21).
9) * [2 ст.б.н. вместе, 1 ст.б.н. в каждую из след. 5 петель], повторить 2 раз от * (всего 18).
10) * [2 ст.б.н. вместе, 1 ст.б.н. в след. петлю], повторить 5 раз от * (всего 12).
11) 1 ст.б.н. в каждую петлю ряда (всего 12).
Оставить длинный конец нити, чтобы потом было удобно пришивать голову к туловищу.
The Comb.
Now that the head is ready, you can make the comb.
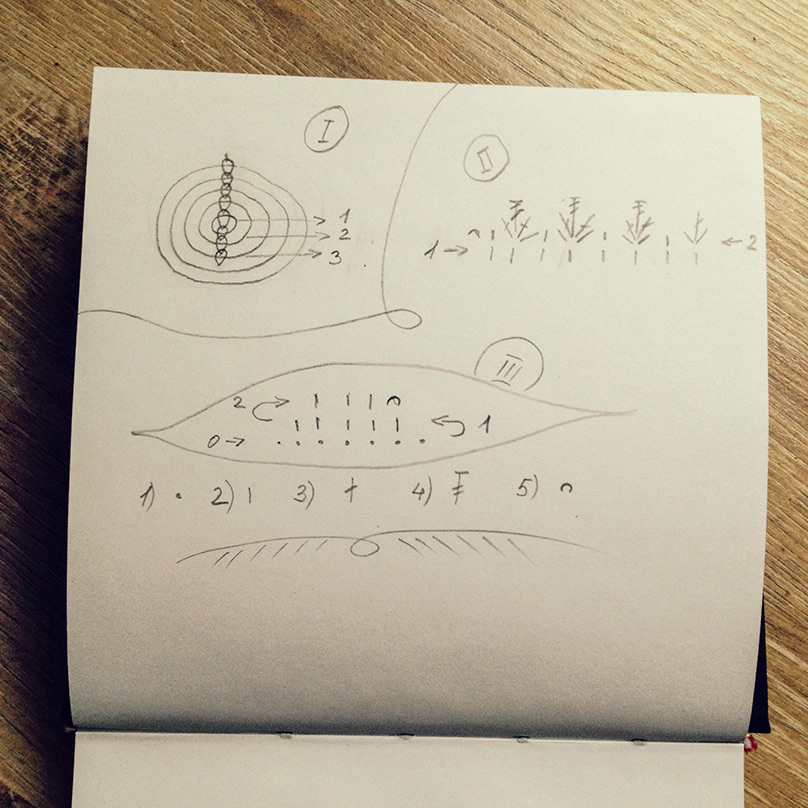
Take the red thread and stitch 8 chain stitches across the top of the head as it is shown on the scheme #1. Take the end of the thread underside, fasten off and cut it off.
Now begin crocheting the comb. Start from the front (the comb sits lower on the back side) and crochet according the scheme #2:
Row 1: make a slip knot, insert the hook into the first chain and pull through a loop of the thread, chain 1 (will count as the first SC). Work 1 SC out of each of the other stitches. Turn.
Row 2: Ch 1 (counts as the first SC), work 1 DC out of the second st from the hook, work SC in the same st. 1 SC in the next st.
* [Work 1 SC out of the next stitch, then 1 DC, 1 half TR, 1 DC and 1 SC all out of the same stitch. Work 1 SC in the next st]. Repeat from the * one more time.
Work 1 SC out of the next stitch, then 1 DC, 1 half TR and 1 DC all out of the same stitch.
1 SC in the next st. End with a sl st in the head. Cut the thread off, but be sure to leave a pretty long tail (about 8 inches/ 20 cm) to be able to stitch the knob with it too.
Now that the comb is ready, fill the head with the stuffing and bring the thread through the head with the needle to the place where the knob should be and stitch it. Bring the thread inside and to the bottom of the head and cut the tail off. Stitch the eyes with the black thread and bring the thread inside and to the bottom of the head and cut the tail off.
Гребешок.
Поперёк макушки будущей курочки, в том месте, где надо быть гребешку, вышить красной нитью тамбурным швом 8 петель (рис. I). Нить вывести вовнутрь головы, закрепить и обрезать.
Начиная спереди курочки, связать гребешок по схеме (рис. II):
1) Сделать петлю, ввести крючок под первую вышитую петлю, протащить через неё петлю и связать 1 в.п. (будет считаться за первый ст.б.н.). 1 ст.б.н. в каждую следующую петлю рада. Поворот.
2) * [1 ст.б.н. в след. п., затем 1 ст.с н., 1 п/ст.с н., 1 ст.с н. и 1 ст.б.н. в ту же п. В след. п. провяжите 1 ст.б.н.], повторить ещё 1 раз от *.
Провяжите 1 ст.б.н. в след. п., затем 1 ст.с н., 1 п/ст.с н. и 1 ст.с н. в ту же п. В след. п. провяжите 1 ст.б.н. Закончите вязать гребешок, провязав соед.п. уже за последней вышитой п. Отрежьте нить, оставив достаточно длинный хвостик (сантиметров 20), чтобы можно было им ещё вышить клюв.Набейте голову наполнителем.
Нить выведите в то место, где будет клювик и вышить клюв галочкой двумя стежками. Нить выведите вниз головы и отрежьте.
Вышейте глаза чёрной нитью крестиками. Нить выведите вниз головы и отрежьте.
The Body.
Take the light yellow yarn and Ch 4, sl st to make a ring. Crochet the rows in a continuous spiral.
Rnd 1: Work 1 SC out of the ring and place the marker in it. Work 5 more SC out of the ring. (6 sts all together)
Rnd 2: Work 2 SC in each of the next 6 sts starting with the first SC of the previous row, the one with the marker. Don’t forget to replace the marker to the first st ofnthe current row. (12 sts all together)
Rnd 3: * [ Work 2 SC out of the next st, work 1 SC in the next st]. Repeat 5 more times from the *. (18 sts all together)
Rnd 4: * [ Work 2 SC out of the next st, work 1 SC in each of the next 5 sts]. Repeat 2 more times from the *. (21 sts all together)
Rnd 5: * [ Work 2 SC out of the next st, work 1 SC in each of the next 6 sts]. Repeat 2 more times from the *. (24 sts all together)
Rnd 6: * [ Work 2 SC out of the next st, work 1 SC in each of the next 7 sts]. Repeat 2 more times from the *. (27 sts all together)
Rnd 7: * [ Work 2 SC out of the next st, work 1 SC in each of the next 8 sts]. Repeat 2 more times from the *. (30 sts all together)
Rnd 8: * [ Work 2 SC out of the next st, work 1 SC in each of the next 14 sts]. Repeat 1 more times from the *. (32 sts all together)
Rnds 9-11: Work 1 SC in each of the sts of the row. (32 sts all together)
Continue with the bright yellow thread.
Rnd 12: * [Work 1 SC into the next st, work 1 long SC into the SC from the two rows below]. Continue in the same way across the row. (32 sts all together)
Rnd 13: Work 1 SC in each of the next 16 sts. Make a tail, then go on working 1 SC into each of the sts until the row ends. (32 sts all together)
Fasten off.
Туловище:
Светло-жёлтой нитью наберите 4 в.п., соедините в круг. Вяжите по спирали.
1) Провяжите 1 ст.б.н. в круг и зацепите за него маркер. Провяжите ещё 5 ст.б.н. в круг (всего 6).
2) 2 ст.б.н. в каждую петлю, начиная с той, на которую был помещён маркер. Не забудьте переставить маркер на первую петлю текущего ряда (всего 12).
3) * [2 ст.б.н. в 1 петлю, 1 ст.б.н. в 1 петлю], повторить 5 раз от * (всего 18).
4) * [2 ст.б.н. в 1 петлю, 1 ст.б.н. в каждую из след. 5 петель], повторить 2 раз от * (всего 21).
5) * [2 ст.б.н. в 1 петлю, 1 ст.б.н. в каждую из след. 6 петель], повторить 2 раз от * (всего 24).
6) * [2 ст.б.н. в 1 петлю, 1 ст.б.н. в каждую из след. 7 петель], повторить 2 раз от * (всего 27).
7) * [2 ст.б.н. в 1 петлю, 1 ст.б.н. в каждую из след. 8 петель], повторить 2 раз от * (всего 30).
8) * [2 ст.б.н. в 1 петлю, 1 ст.б.н. в каждую из след. 14 петель], повторить 1 раз от * (всего 32).
9-11) 1 ст.б.н. в каждую петлю ряда (всего 32).
Сменить нить на ярко жёлтую.
12) Провяжите 1 обыкновенный ст.б.н. в след. п., 1 длинный ст.б.н. в след. п., вводя крючок на ряд ниже. Продолжайте в том же духе до конца ряда (всего 32).
13) 1 ст.б.н. в каждую из след. 16 п., сформируйте хвостик, продолжайте вязать по 1 ст.б.н. в каждую след. п. до конца ряда (всего 32).
Отрежьте и закрепите нить.
The Wings.
To make a wing, take the bright yellow thread and follow the 3d scheme:
Ch 7.
Row 1: Work 1 SC into each of the next 5 sts starting from the second ch from the hook. Turn.
Row 2: Work 1 SC into each of the next 3 sts starting from the second st from the hook and end with a sl st into the next st.
Fasten off, but leave the tail long enough to use it for stitching the wing to its place.
Крылья.
Вяжите ярко-жёлтой нитью по схеме (рис. III):
Наберите 7 в.п..
1) Провяжите по 1 ст.б.н. в каждую из след. 5 п., начиная со второй в.п. от крючка. Поверните вязание.
2) Провяжите по 1 ст.б.н. в каждую из след. 3 п., начиная со второй п. от крючка. Закончите с помощью соед.п. в след. п.
Затяните нить и отрежьте, оставив достаточно длинный хвостик, чтобы с его помощью прикрепить крыло на место.
Assembling.
Sew the head to the body with an invisible stitch, inserting the needle under the second row of the body and behind the posts of the last row of the head.
Sew on the wings.
Сборка:
Голову пришить к телу потайным швом, цепляясь за тело над вторым рядом, за голову за самые нижние столбики.
Пришить крылышки.
Happy crocheting!
Приятного вязания!


 Привет, странник!